Setting up Amazon CloudFront CDN Http & Https (Progressive Download)
-
Go to [Amazon Cloud front Console] (https://console.aws.amazon.com/cloudfront/home)
-
Create a new Distribution of type Web, and Origin Domain Name select your bucket from list
-
Under Viewer Protocol Policy: Choose HTTP and HTTPS
-
Select your bucket as the origin ID, and decide wether you want logging or not.
-
Click on Create Distribution
-
Copy your CloudFront domain name (example: d2xxxxxxxxxxxx.cloudfront.net) for later use.
Setting up the Remote Storage Profile in the Admin Console
First, you must enable the necessary configuration options for your partner:
-
Find your partner in the list of partners, click on the right drop down box and select Configure
-
Under Remote Storage Policy, set Delivery Policy to “Remote Storage Only”
-
Check the Delete exported storage checkbox.
-
Under Enable/Disable Features, make sure that Remote Storage is checked.
-
Click Save.
Next we must configure the Remote Storage Profile. In order to do this, we must click on the partner’s left drop-down box (under Profiles) and select Remote Storage. You should see the Remote Storage Profiles page for your publisher (If you haven’t yet set up any remote storage profiles, the list should be empty).
(Assuming that you have already set up an S3 bucket, and that you have an Access Key ID and a Secret Access Key)
-
Create a new profile by writing your publisher id in the right Publisher ID input box and clicking Create New.
-
Give a name to your Remote Storage (for example "Amazon S3")
-
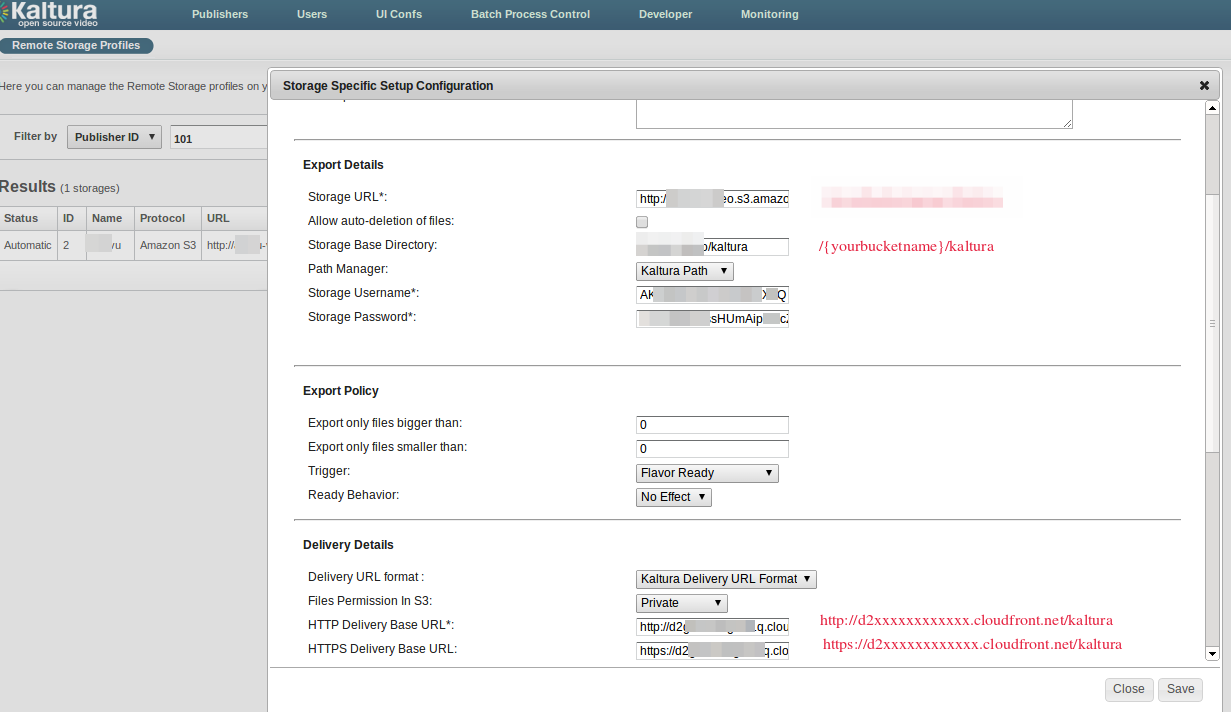
For Storage URL type http://{yourbucketname}.s3.amazonaws.com (replace {yourbucketname} with your bucket name on S3)
-
In Storage Base Directory, write “/{yourbucketname}/kaltura” (keep in mind the leading slash, and change yourbucketname to your bucket name)
-
Storage Username – enter your amazon aws api Access Key ID
-
Storage Password – paste your amazon aws api Secret Access Key
-
Under HTTP Delivery Base URL, type “http://{your amazon cloudfront domain}/kaltura” – replace {your amazon cloudfront domain} with the cloudfront domain you created in the previous section).
HTTP Delivery Base URL*:  http://d2xxxxxxxxxxxx.cloudfront.net/kaltura
HTTPS Delivery Base URL:  https://d2xxxxxxxxxxxx.cloudfront.net/kaltura
- Save the new Remote Storage Profile
Add a crossdomain.xml file Create a crossdomain.xml file in the root of your S3 bucket
<cross-domain-policy xmlns:xsi="http://www.w3.org/2001/XMLSchema-instance" xsi:noNamespaceSchemaLocation="http://www.adobe.com/xml/schemas/PolicyFile.xsd">
    <allow-access-from domain="*" to-ports="*" secure="false"/>
    <site-control permitted-cross-domain-policies="all"/>
    <allow-http-request-headers-from domain="*" headers="*"/>
</cross-domain-policy>
Final Step – Enable the remote storage profile
-
Click on the dropdown box next to your new storage profile in the Remote Storage Profiles page in Kaltura Admin Console
-
Select Export Automatically and then click OK
-
You will receive the confirmation that your storage was autoed :)
Test your new configuration You can go ahead and test your new configuration. Upload a new video in the KMC, let it convert, and wait for it to get distributed. After that, try to play the entry and analyse it in your favorite sniffer. You should see that the movies are being downloaded from your cloudfront CDN, look for flv and mp4 files.